Thanks to the guys those who ported the Esp8266 into Arduino IDE and helping all the arduino users happy to the core. Yes it's been long time since they did and this post is bit later to thanks the good hearted work by the guys out there.
Lets begin with Installing the Esp8266 support for the Arduino and see how to blink an LED ( the hello world in the electronics )
check out the video to know step by step tutorial on how to get started with our favourite chip Esp8266
Firstly open the Arduino IDE
Go to files and click on the preference in the Arduino IDE

copy the below code in the Additional boards Manager
http://arduino.esp8266.com/stable/package_esp8266com_index.json
click OK to close the preference Tab.

After completing the above steps , go to Tools and board, and then select board Manager
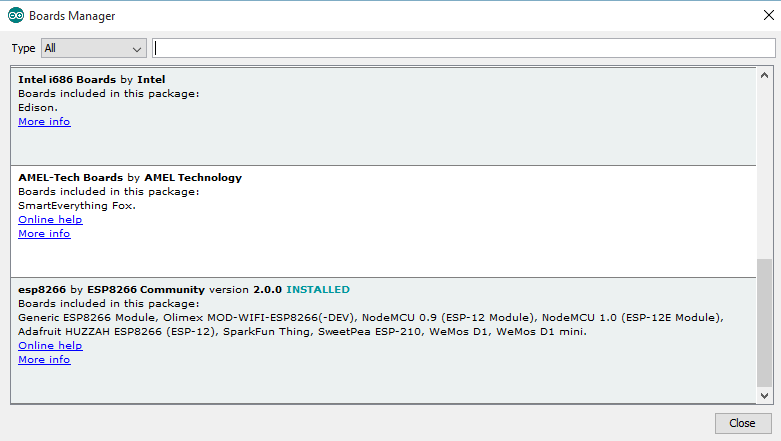
Navigate to esp8266 by esp8266 community and install the software for Arduino.
Once all the above process been completed we are read to program our esp8266 with Arduino IDE.

For this example I have used NodeMCU esp8266 and if you are using any other vendor wifi chips or generic wifi module please check with the esp8266 Pin mapping which is very essential to make things works.
The reason why I used D7 pin for this example is , I uploaded the basic blink program that comes with the examples program in the arduino IDE which is connected with 13 pin of arduino. The 13th pin is mapped into D7 pin of NodeMCU.
go to board and select the type of esp8266 you are using. and select the correct COM port to run the program on your esp8266 device.
void setup() {
  // initialize digital pin 13 as an output.
  pinMode(13, OUTPUT);
}

// the loop function runs over and over again forever
void loop() {
  digitalWrite(13, HIGH);   // turn the LED on (HIGH is the voltage level)
  delay(1000);              // wait for a second
  digitalWrite(13, LOW);    // turn the LED off by making the voltage LOW
  delay(1000);              // wait for a second
}
upload the program and see the results.
if you like the above tutorial and if you want try out with cool projects you can also check this link here , that's the amazon book link where you can use that book to make IoT with Esp8266 or Nodemcu, that books gives you basic coverage on how to do simple things and get yourself started with arduino and goes on developing projects like sending data to webserver and creating a webserver, uploading and controlling data from a webpage, how to interface TFT LCD and I2C devices and many more things can find on the link.


Where are you sourcing the 3.3V power to the ESPP ? from .
ReplyDeleteI am using dev board which has on board 3.3v and 5v power.
DeleteGetting Started With Esp8266 (Nodemcu) And Arduino Ide >>>>> Download Now
Delete>>>>> Download Full
Getting Started With Esp8266 (Nodemcu) And Arduino Ide >>>>> Download LINK
>>>>> Download Now
Getting Started With Esp8266 (Nodemcu) And Arduino Ide >>>>> Download Full
>>>>> Download LINK mA
How do I do the same using the Raspberry Pi ? I have a Model B, and I need some help with pin connections.
ReplyDeleteYou can do the same with raspberry by writing a script that calls when you hit a button to do a work, it's just easy as that if you already know basics stuff about this board.
DeleteI have a ESP8266 that I bought from SP road here in Bangalore and it looks similar to your picture above, but I dont know if it is a nodeMCU or a Clone , and the pins look DIFFERENT !
ReplyDeleteMine has 8 vertical pins ( RX and TX columns ) . Please help identify.
In this tutorial, you have Uploaded the Blink Code to NodeMCU.
ReplyDeleteCan I do the same to my hardware, mine looks like this.
http://www.amazon.in/ESP8266-Serial-Wireless-Transceiver-Module/dp/B00O34AGSU/ref=sr_1_fkmr0_2?ie=UTF8&qid=1452943507&sr=8-2-fkmr0&keywords=iot+espp8266
How do I do the blinking of the LED using this .
Hi the module that you are using is a generic hardware which needs to supported by voltage regulator and also you need FTDI or other programmer to upload program, and it also lacks pins and memory, with this you can still blink a led and connect to web and control few devices with it. make sure you have proper voltage regulator and you should press flash and reset pin when uploading program to it
DeleteHi...can i do the same with only arduino board and esp8266...also where should i connect rx and tx of esp8266???
ReplyDeleteThis comment has been removed by the author.
ReplyDeleteHi, I can not select the port, because it´s not enabled, just like yours in this picture you are showing.
ReplyDeleteHow I can change or select the port? How did you do?
thanks
Dude, totally! There's no information on what to do here - did you get this problem solved?
DeleteThe generic hardware which needs to supported Internet of things.The Industrial Internet of things (IIoT) is disrupting businesses across the globe and will also change the way we live and work.
ReplyDeleteIt will not only redefine how machines and humans interact but also improve operational efficiency and increase levels of productivity.
If you are looking for the Internet of Thing Solutions and sevices then very big companies available in the market .
Thease companies provide the best solutions by integrating the best of our Industry components
This comment has been removed by the author.
ReplyDeleteIn the event that you have a rundown of different clients that you have to send value-based messages from your site or application, you should search for a quality Bulk Texting administration. This will enable you to send boundless messages over a scope of systems around the world.bulk
ReplyDeleteHi, I think your website might be having browser compatibility issues. When I look at your website in Ie, it looks fine but when opening in Internet Explorer, it has some overlapping. I just wanted to give you a quick heads up! Other then that, amazing blog! plant automation
ReplyDeleteTop quality blog with unique content and found valuable looking forward for next updated thank you
ReplyDeleteEthical Hacking Course in Bangalore
Getting Started With Esp8266 (Nodemcu) And Arduino Ide >>>>> Download Now
ReplyDelete>>>>> Download Full
Getting Started With Esp8266 (Nodemcu) And Arduino Ide >>>>> Download LINK
>>>>> Download Now
Getting Started With Esp8266 (Nodemcu) And Arduino Ide >>>>> Download Full
>>>>> Download LINK
I appreciate the clear and concise writing. Take a look at this profile Free Browser Games. Improve hand-eye coordination while having fun with CPS browser games.
ReplyDelete